Several years ago I wrote this post about my daily backup process. I used SyncToy for many years, but after I accumulated several terabytes of data, it was getting too slow. With SyncToy it was taking twelve hours to finish my nightly backup. I did not know if SyncToy was slow, or if I just had too much data.
I did a little research and found some free alternatives. I wanted a solution that worked in a way similar to SyncToy. I did not want a backup utility that created a “backup file” that had all my files in it. It is more difficult to extract files out of a backup, especially when you want just one file. I needed a tool that copies each of my files to an external hard drive, one file at a time. I can take a backup drive on the road with me and have everything from my main computer on a portable USB drive.
I tried several programs and was most satisfied with FreeFileSync. The initial backup took eight hours, but it takes a while to copy several terabytes of data no matter what utility is used. After the initial backup, FreeFileSync does the nightly backup in less than an hour. That is about ten times faster than SyncToy was operating.
FreeFileSync also does versioning. This prevents the accidental loss of a file that is edited or updated. Let me explain why this is important. Last Monday I took a picture with my 5D digital camera. The original was 21 megapixels and was a 2×3 rectangle. On Monday night the original file was backed up during my routine nightly backup. On Tuesday I edited the picture for a project in which I needed a square 400×400 pixel picture for a web page. On Tuesday night FreeFileSync noticed that my original picture had changed from a 21 megapixel rectangle to a 0.16 megapixel square. Since the original was backed up on Monday, FreeFileSync took the original and saved it as an old version and then made a backup of the new smaller file. I have the original and the new edited version. If you have ever lost a resume, paper for a project or anything else because of editing, versioning can save you from re-doing the whole project.
Here is how FreeFileSync works.
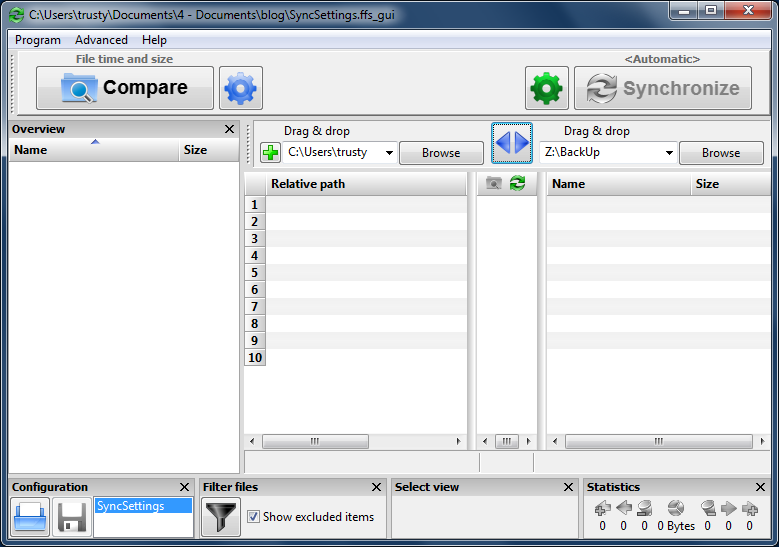
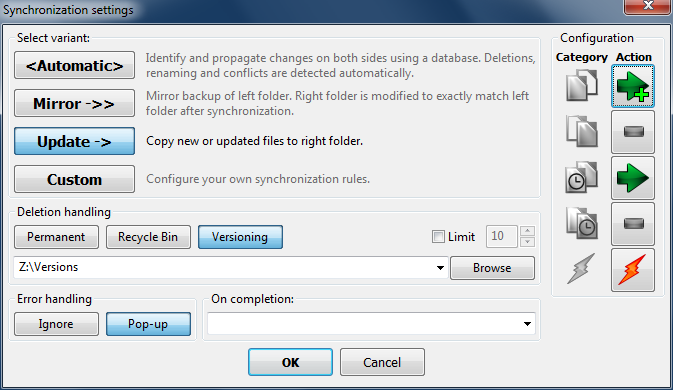
Using a “left” and “right” model, the original files are on the left. The original and backup folders can be dragged into the interface. After selecting the folders, the Synchronize button will sync the two sides. Clicking the green gear icon opens the synchronization settings window.
I use the Update option. This copies the new files on the left side to the right side. I also use Versioning in the Deletion Handling section. Before a file on the right side is over-written, the old version is placed in the Versioning folder. Each day a new version folder is created with a date stamp. If you edit a file every day, you will get a new version every day. Since hard drive space is cheap, I usually keep my old versions forever, but they could be deleted at any time.
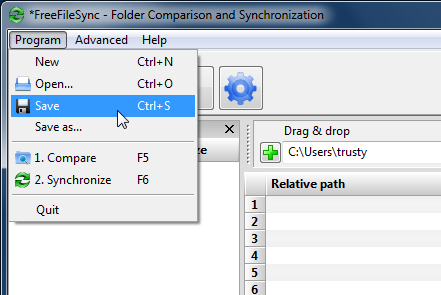
When everything is setup, save your settings.
This creates a batch file that can be setup as an automatic process using the Windows Task Scheduler.
In Task Scheduler, create a Basic Task with
“C:\Program Files\FreeFileSync\FreeFileSync.exe”
as the program and
“C:\Users\ValuedUser\Batch Files\SyncSettings.ffs_gui”
as the optional added argument. Is it critical that both of the above options be inside double quotes.
Finally, automation is the key to any good backup plan. If you are required to manually initiate your backup utility, you will forget and ultimately you will lose your files. My backup happens automatically every night after I go to bed. My computer does more while I sleep than many people do all day long.


